Java并发编程终结篇,J.U.C.。
AQS
概述
全称AbstractQueuedSynchronizer,是阻塞式锁和相关的同步器工具的框架。
特点:
- 用state属性来表示资源的状态(分独占模式和共享模式),子类需要定义如何维护这个状态,控制如何获取锁和释放锁
- getState - 获取 state 状态
- setState - 设置 state 状态
- compareAndSetState - cas 机制设置 state 状态
- 独占模式是只有一个线程能够访问资源,而共享模式可以允许多个线程访问资源
- 提供了基于 FIFO 的等待队列,类似于 Monitor 的 EntryList
- 条件变量来实现等待唤醒机制,支持多个条件变量,类似于 Monitor 的 WaitSet
子类主要实现一些方法(默认抛出 UnsupportedOperationException):
- tryAcquire
- tryRelease
- tryAcquireShared
- tryReleaseShared
- isHeldExclusively
获取锁的姿势:
1 | // 如果获取锁失败 |
释放锁的姿势:
1 | // 如果释放锁成功 |
实现不可重入锁
自定义同步器
1 | class MySync extends AbstractQueuedSynchronizer { |
自定义锁
1 | class MyLock implements Lock { |
测试
1 | MyLock lock = new MyLock(); |
ReentrantLock原理
非公平锁实现原理
加锁流程
构造器默认为非公平实现
1 | public ReentrantLock() { |
没有竞争时候
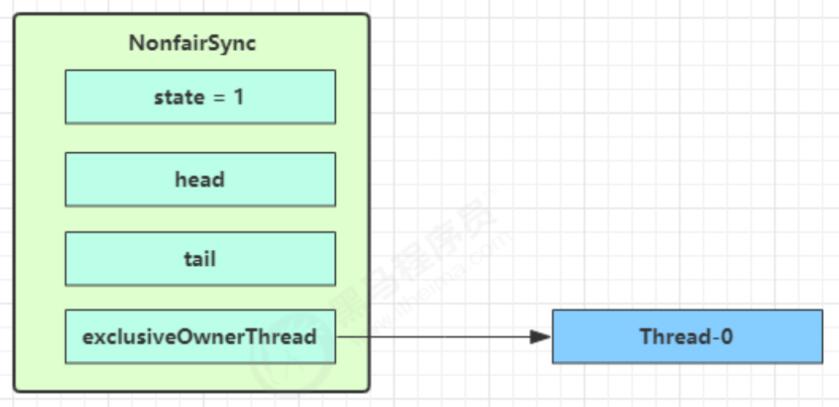
1 | final void lock() { |
- CAS 尝试将 state 由 0 改为 1
- 成功后将owner改成当前线程
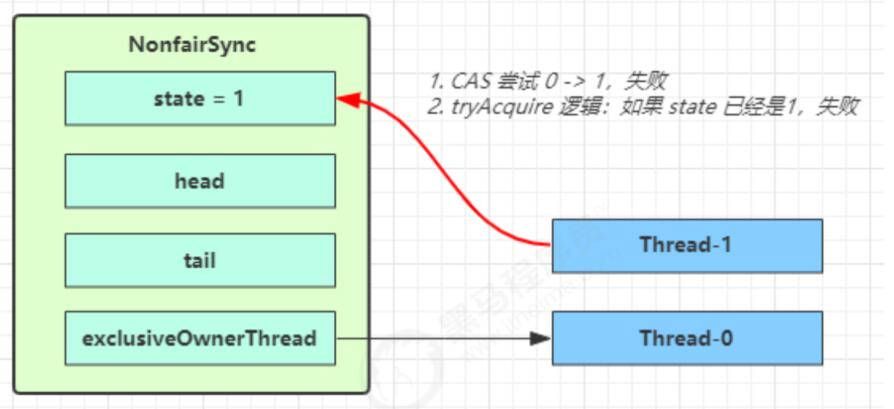
第一个竞争出现的时候
1 | public final void acquire(int arg) { |
Thread-1执行了
- CAS尝试将state由0改为1,结果失败
- 进入tryAcquire逻辑,这时state已经是1,结果仍然失败
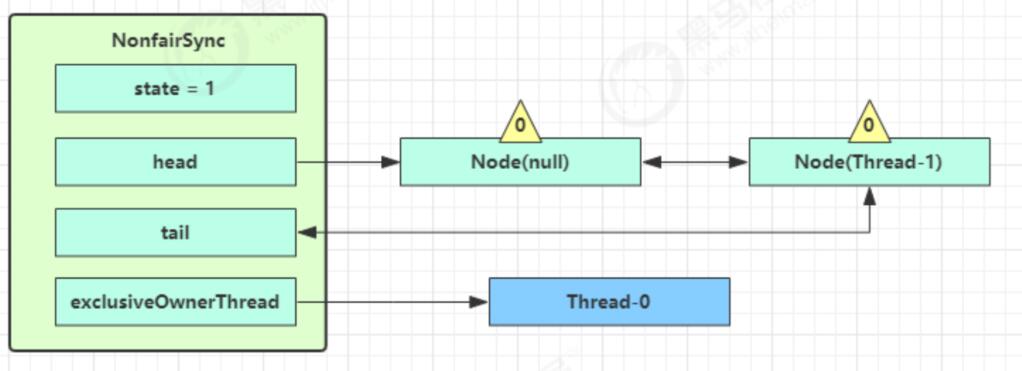
- 接下来进入addWaiter逻辑,构造Node队列
- 图中黄色三角表示该Node的 waitStatus 状态,其中0为默认正常状态
- Node的创建是懒惰的
- 首次创建会创建两个Node,其中第一个Node称为Dummy(哑元)或哨兵,用来占位,并不关联线程
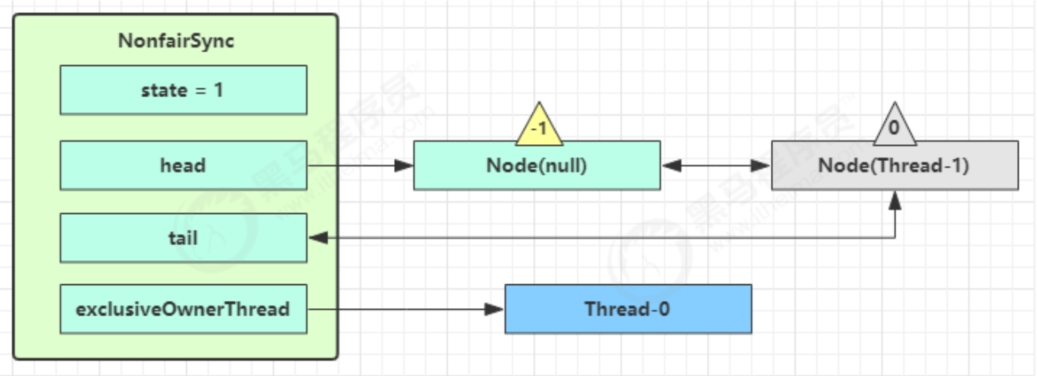
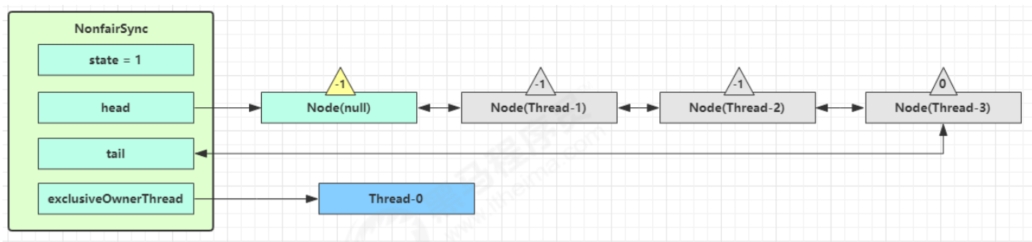
当前线程进入acquireQueued逻辑
- acquireQueued 会在一个死循环中不断尝试获得锁,失败后进入park阻塞
- 如果自己是紧邻着 head(排第二位),那么再次 tryAcquire 尝试获取锁,当然这时 state 仍为1,失败
- 进入shouldParkAfterFailedAcquire逻辑,将前驱 node,即head的waitStatus改为-1,表示它有责任唤醒它的后继节点(Thread-1长期未获得锁应该进入阻塞,所以需要有一个结点唤醒,由前驱唤醒),这次返回false
- shouldParkAfterFailedAcquire执行完毕后再次进入循环,再次tryAcquire尝试获取锁,这时候state仍为1,失败
- 当再次进入shouldParkAfterFailedAcquire时候,这时候因为前驱node的waitStatus已经是-1,这次返回true
- 进入parkAndCheckInterupt,Thread-1 park,灰色表示
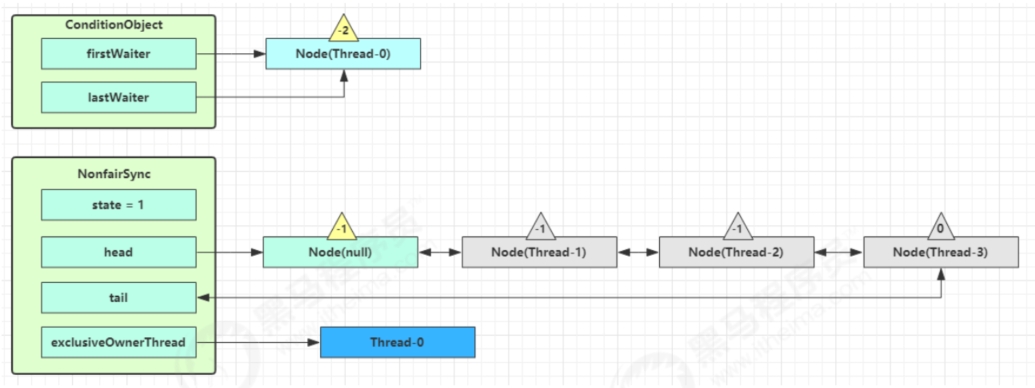
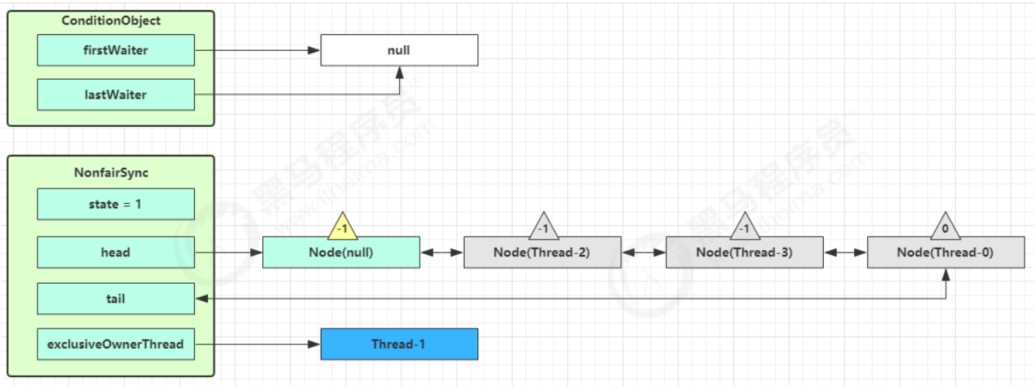
再次有多个线程经历上述竞争失败,会变成下图
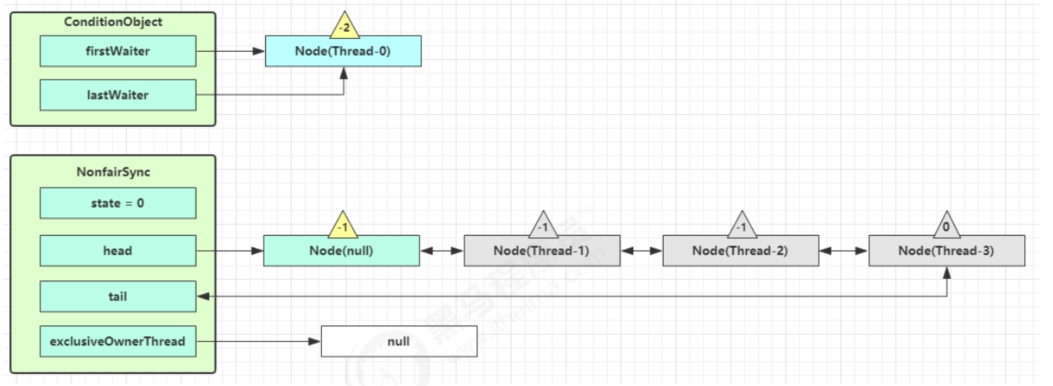
Thread-0释放锁,进入tryRelease流程,如果成功
- 设置exclusiveOwnerThread为null
- state = 0
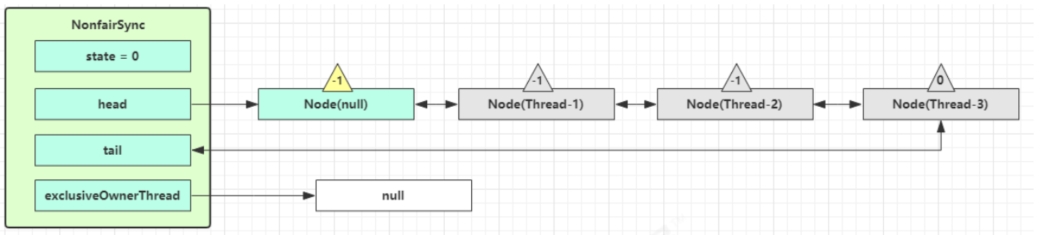
当前队列不为null,并且head的waitStatus = -1,进入unparkSuccessor流程。找到队列中离head最近的一个没取消的Node,unpark恢复其运行。回到Thread-1的acquireQueued流程
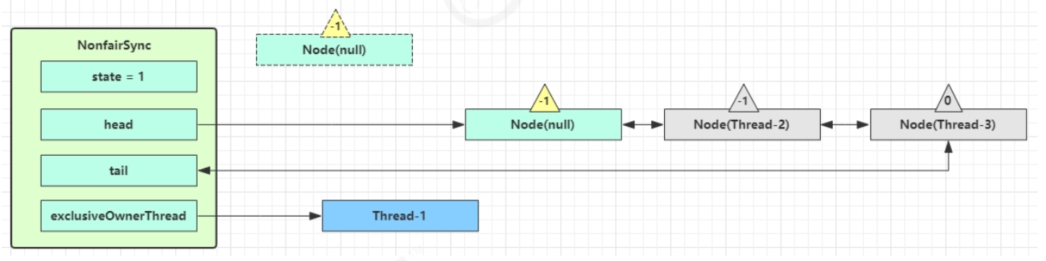
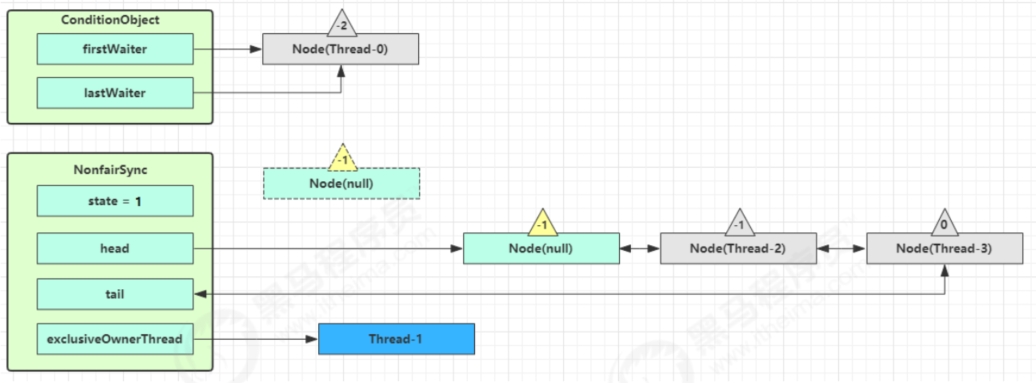
如果没有竞争加锁成功,会设置
- exclusiveOwnerThread为Thread-1,state = 1
- head指向刚刚Thread-1所在的Node,该Node清空Thread
- 原本的head因为从链表断开,而可被垃圾回收
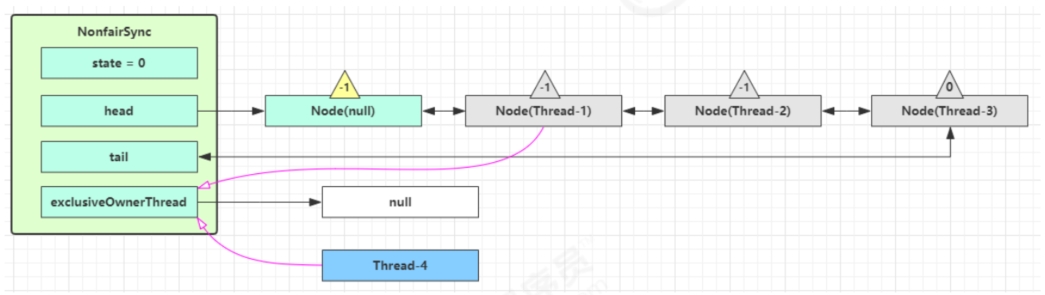
如果这时候有其他线程来竞争,如Thread-4,又碰巧被Thread-4抢先
- Thread-4被设置为exclusiveOwnerThread,state = 1
- Thread-1再次进入acquireQueued流程,获取锁失败,重新进入park阻塞
锁重入原理
1 | static final class NonfairSync extends Sync { |
可打断原理
不可打断模式
在此模式下,即使它被打断,仍会驻留在AQS队列中,一直要等到获得锁后方能得知自己被打断了。
1 | if ( |
可打断模式
1 | if (shouldParkAfterFailedAcquire(p, node) && |
公平锁实现原理
1 | // 与非公平锁主要区别在于 tryAcquire 方法的实现 |
条件变量实现原理
每个条件变量其实就对应着一个等待队列,其实现类是ConditionObject。
await
开始hThread-0持有锁,调用await,进入ConditionObject的addConditionWaiter流程。创建新的Node状态为-2(Node.CONDITION),关联Thread-0,加入等待队列尾部。
接下来j进入AQS的fullyRelease流程,释放同步器上的所有锁。
Unpark AQS队列中的下一个节点,竞争锁,假设没有其他竞争线程,那么Thread-1竞争成功。

Park阻塞Thread-0。
signal
以上图为例,接下来假设Thread-1去唤醒Thread-0。进入ConditionObject的doSignal流程,取得等待队列中的第一个Node,即Thread-0所在的Node。
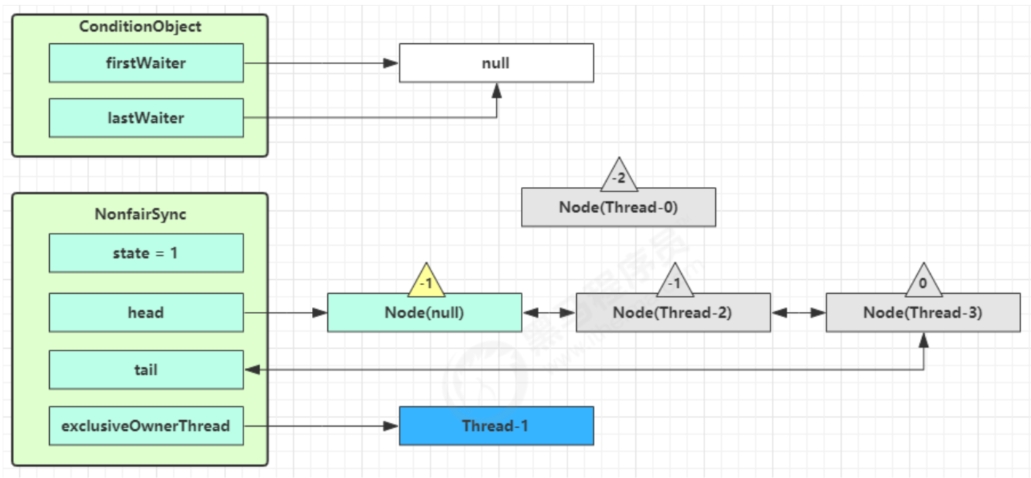
执行transferForSignal流程,将该Node加入到AQS尾部,将Thread-0的waitStatus改为0,Thread-3的waitStatus改为-1。
Thread-1释放锁,进入Unlock流程。
读写锁
ReentrantReadWriteLock
当读操作远远多于写操作的时候,这时候使用读写锁让读-读可以并发,提高性能,类似于数据库中的select ... from ... lock in share mode。
1 |
|
注意事项
-
读锁不支持条件变量
-
重入时不支持升级,即持有读锁的情况下去获取写锁,会导致获取写锁永久等待
1
2
3
4
5
6
7
8
9
10
11
12r.lock();
try {
// ...
w.lock();
try {
// ...
} finally{
w.unlock();
}
} finally{
r.unlock();
} -
重入时支持降级,即持有写锁的情况下去获取读锁
1
2
3
4
5
6
7
8
9
10
11
12
13
14
15
16
17
18
19
20
21
22
23
24
25
26
27
28
29
30
31class CachedData {
Object data;
// 是否有效,如果失效,需要重新计算 data
volatile boolean cacheValid;
final ReentrantReadWriteLock rwl = new ReentrantReadWriteLock();
void processCachedData() {
rwl.readLock().lock();
if (!cacheValid) {
// 获取写锁前必须释放读锁
rwl.readLock().unlock();
rwl.writeLock().lock();
try {
// 判断是否有其它线程已经获取了写锁、更新了缓存, 避免重复更新
if (!cacheValid) {
data = ...
cacheValid = true;
}
// 降级为读锁, 释放写锁, 这样能够让其它线程读取缓存
rwl.readLock().lock();
} finally {
rwl.writeLock().unlock();
}
}
// 自己用完数据, 释放读锁
try {
use(data);
} finally {
rwl.readLock().unlock();
}
}
}
StampedLock
该类自JDK 8加入,是为了进一步优化读性能,它的特点是在使用读锁、写锁时候都必须配合戳的使用。
加解读锁
1 | long stamp = lock.readLock(); |
加解写锁
1 | long stamp = lock.writeLock(); |
乐观读,StampedLock支持tryOptimisticRead()方法(乐观读),读取完毕之后需要做一次戳校验,如果校验通过,表示这期间确实没有写操作,数据可以安全使用,如果校验没通过,需要重新获取读锁,保证数据安全。
1 | long stamp = lock.tryOptimisticRead(); |
使用
1 |
|
注意
- StampedLock不支持条件变量
- 不支持可重入
Semaphore
信号量,用来限制能同时访问共享资源的线程上限。
1 | public class Test { |
-
使用semaphore限流。在访问高峰期时,让请求线程阻塞,高峰期过去之后再释放许可,当然它只适合限制单机数量,并且仅是限制线程数,而不是限制资源数。
-
用semaphore实现简单连接池,对比享元模式用wait/notify实现,性能和可读性显然更好,注意下面实现中线程数和数据库连接数是相等的。
1
2
3
4
5
6
7
8
9
10
11
12
13
14
15
16
17
18
19
20
21
22
23
24
25
26
27
28
29
30
31
32
33
34
35
36
37
38
39
40
41
class Pool {
private final int poolSize;
private Connection[] connections;
private AtomicIntegerArray states;
private Semaphore semaphore;
public Pool(int poolSize) {
this.poolSize = poolSize;
this.semaphore = new Semaphore(poolSize);
this.states = new AtomicIntegerArray(new int[poolSize]);
for (int i = 0; i < poolSize; i++) {
connections[i] = new DBConect("连接" + (i + 1));
}
}
public Connection borrow() {
try {
semaphore.acquire();
} catch (InterruptedException e) {
e.printStackTrace();
}
for (int i = 0; i < poolSize; i++) {
if (states.get(i) == 0) {
if (states.compareAndSet(i, 0, 1)) {
log.debug("borrow{}", connections[i]);
return connections[i];
}
}
}
return null;
}
public void free(Connection connection) {
for (int i = 0; i < poolSize; i++) {
if (connections[i] == connection) {
states.set(i, 0);
log.debug("free{}", connection);
semaphore.release();
break;
}
}
}
}假设刚开始,permits(state)为3,这时候有五个线程来获取资源。假设其中 Thread-1,Thread-2,Thread-4 cas 竞争成功,而Thread-0和Thread-3竞争失败,进入AQS队列park 阻塞。这时Thread-4释放了permits,接下来Thread-0竞争成功,permits再次设置为0,设置自己为head节点,断开原来的head节点,unpark接下来的Thread-3节点,但由于permits是0,因此Thread-3在尝试不成功后再次进入park状态。
CountDownLatch
CountDownLatch 在多线程并发编程中充当一个计时器的功能,并且维护一个 count 的变量,并且其操作都是原子操作,该类主要通过 countDown() 和 await() 两个方法实现功能的,首先通过建立 CountDownLatch 对象,并且传入参数即为 count 初始值。如果一个线程调用了 await() 方法,那么这个线程便进入阻塞状态,并进入阻塞队列。如果一个线程调用了 countDown() 方法,则会使 count-1;当 count 的值为 0 时,这时候阻塞队列中调用 await() 方法的线程便会逐个被唤醒,从而进入后续的操作。
Thread 对象的 join 方法可以实现相同的功能,但是特别地,当使用了线程池时,则 join() 方法便无法实现。但 CountDownLatch 依然可以实现功能。
CountDownLatch 类主要使用的场景有明显的顺序要求:比如所有英雄都加载完之后才能进图游戏等等,因此 CountDownLatch 完善的是某种逻辑上的功能,使得线程按照正确的逻辑进行。
1 | public class Test { |
线程池改进:
1 | CountDownLatch latch = new CountDownLatch(2); |
应用,等玩家都加载完毕后开启游戏:
1 | public static void main(String[] args) throws InterruptedException { |
微服务中等待多个服务器返回的结果:
1 | public static void main(String[] args) throws InterruptedException { |
CyclicBarrier
循环栅栏,用来进行线程协作,等待线程满足某个个数。构造时候设置计数个数,每个线程运行到某个需要同步的时刻,调用await进行等待,当等待线程数满足计数个数时候,继续运行。用来解决CountDownlatch不能重用的问题,比如某几个同步线程需要运行三遍。CyclicBarrier 与 CountDownLatch 的主要区别在于 CyclicBarrier 是可以重用的 CyclicBarrier 可以被比喻为『人满发车』。
1 | // 初始化数量和计数个数要一致 |
线程安全集合类
-
遗留的线程安全集合,如HashTable,Vector
-
使用Collections装饰的线程安全集合,如
- Collections.synchronizedCollection
- Collections.synchronizedList
- Collections.synchronizedMap
- Collections.synchronizedSet
- Collections.synchronizedNavigableMap
- Collections.synchronizedNavigableSet
- Collections.synchronizedSortedMap
- Collections.synchronizedSortedSet
-
JUC
-
它们有规律,里面包含三类关键词:Blocking、CopyOnWrite、Concurrent
-
Blocking 大部分实现基于锁,并提供用来阻塞的方法
-
CopyOnWrite 之类容器修改开销相对较重
-
Concurrent 类型的容器
- 内部很多操作使用 cas 优化,一般可以提供较高吞吐量
- 弱一致性
- 遍历时弱一致性,例如,当利用迭代器遍历时,如果容器发生修改,迭代器仍然可以继续进行遍历,这时内容是旧的
求大小弱一致性,size 操作未必是 100% 准确,fast-save - 读取弱一致性
遍历时如果发生了修改,对于非安全容器来讲,使用 fail-fast 机制也就是让遍历立刻失败,抛出
ConcurrentModificationException,不再继续遍历
-
ConcurrentHashMap
ConcurrentHashMap从JDK1.5开始随java.util.concurrent包一起引入JDK中,在JDK8以前,ConcurrentHashMap都是基于Segment分段锁来实现的,在JDK8以后,就换成synchronized和CAS这套实现机制了。
JDK1.8中的ConcurrentHashMap不再使用Segment分段锁,而是以table数组的头结点作为synchronized的锁。和JDK1.8中的HashMap类似,对于hashCode相同的时候,在Node节点的数量少于8个时,这时的Node存储结构是链表形式,时间复杂度为O(N),当Node节点的个数超过8个时,则会转换为红黑树,此时访问的时间复杂度为O(long(N))。旧版本的一个segment锁,保护了多个hash桶,而jdk8版本的一个锁只保护一个hash桶,由于锁的粒度变小了,写操作的并发性得到了极大的提升。
如何保证线程安全
- 使用volatile保证当Node中的值变化时对于其他线程是可见的
- 使用table数组的头结点作为synchronized的锁来保证写操作的安全
- 当头结点为null时,使用CAS操作来保证数据能正确的写入。
高效扩容
-
扩容线程增大
扩容时,需要锁的保护。因此:旧版本最多可以同时扩容的线程数是segment锁的个数。
而jdk8的版本,理论上最多可以同时扩容的线程数是:hash桶的个数(table数组的长度)。但是为了防止扩容线程过多,ConcurrentHashMap规定了扩容线程每次最少迁移16个hash桶,因此jdk8的版本实际上最多可以同时扩容的线程数是:hash桶的个数/16。 -
扩容期间,依然保证较高的并发度
旧版本的segment锁,锁定范围太大,导致扩容期间,写并发度,严重下降。而新版本的采用更加细粒度的hash桶级别锁,扩容期间,依然可以保证写操作的并发度。
ConcurrentHashMap的put方法是如何通过CAS确保线程安全的
假设此时有2个put线程,都发现此时桶为空,线程一执行casTabAt(tab,i,null,node1),此时tab[i]等于预期值null,因此会插入node1。随后线程二执行casTabAt(tba,i,null,node2),此时tab[i]不等于预期值null,插入失败。然后线程二会回到for循环开始处,重新获取tab[i]作为预期值,重复上述逻辑。
以上通过for循环+CAS操作,实现并发安全的方式就是无锁算法(lock free)的经典实现。
重要属性和内部类
1 | // 默认为 0 |
HashMap 和 TreeMap
这里他们两个都不是线程安全的,放在这主要是和上边的并发对比一下。
- HashMap是通过hashcode()对其内容进行快速查找的;HashMap中的元素是没有顺序的;TreeMap中所有的元素都是有某一固定顺序的,如果需要得到一个有序的结果,就应该使用TreeMap。
- HashMap和TreeMap都不是线程安全的;
- HashMap继承AbstractMap类;覆盖了hashcode() 和equals() 方法,以确保两个相等的映射返回相同的哈希值;TreeMap继承SortedMap类;他保持键的有序顺序;
- HashMap:基于hash表实现的;使用HashMap要求添加的键类明确定义了hashcode() 和equals() (可以重写该方法);为了优化HashMap的空间使用,可以调优初始容量和负载因子;TreeMap:基于红黑树实现的;TreeMap就没有调优选项,因为红黑树总是处于平衡的状态;
- HashMap:适用于Map插入,删除,定位元素;TreeMap:适用于按自然顺序或自定义顺序遍历键(key);
Hashmap 是一个最常用的Map,它根据键的HashCode 值存储数据,根据键可以直接获取它的值,具有很快的访问速度,遍历时,取得数据的顺序是完全随机的。HashMap最多只允许一条记录的键为Null;允许多条记录的值为 Null;HashMap不支持线程的同步,即任一时刻可以有多个线程同时写HashMap;可能会导致数据的不一致。如果需要同步,可以用Collections的synchronizedMap方法使HashMap具有同步的能力,或者使用ConcurrentHashMap。
Hashtable与 HashMap类似,它继承自Dictionary类,不同的是:它不允许记录的键或者值为空;它支持线程的同步,即任一时刻只有一个线程能写Hashtable,因此也导致了 Hashtable在写入时会比较慢。
LinkedHashMap保存了记录的插入顺序,在用Iterator遍历LinkedHashMap时,先得到的记录肯定是先插入的.也可以在构造时用带参数,按照应用次数排序。在遍历的时候会比HashMap慢,不过有种情况例外,当HashMap容量很大,实际数据较少时,遍历起来可能会比LinkedHashMap慢,因为LinkedHashMap的遍历速度只和实际数据有关,和容量无关,而HashMap的遍历速度和他的容量有关。
TreeMap实现SortMap接口,能够把它保存的记录根据键排序,默认是按键值的升序排序,也可以指定排序的比较器,当用Iterator 遍历TreeMap时,得到的记录是排过序的。
synchronized 和 reentrantlock
共同点
- 用来协调多线程对共享对象、变量的访问
- 都是可重入锁,同一线程可以多次获得同一个锁
- 保证了可见性和互斥性
不同点
- ReentrantLock 显式的获得、释放锁,synchronized 隐式获得释放锁
- ReentrantLock 可响应中断、可轮回,synchronized 是不可以响应中断的,为处理锁的不可用性提供了更高的灵活性
- ReentrantLock 是 API 级别的,synchronized 是 JVM 级别的
- ReentrantLock 可以实现公平锁
- ReentrantLock 通过 Condition 可以绑定多个条件
- 底层实现不一样, synchronized 是同步阻塞,使用的是悲观并发策略,lock 是同步非阻塞,采用的是乐观并发策略
- Lock 是一个接口,而 synchronized 是 Java 中的关键字,synchronized 是内置的语言实现。
- synchronized 在发生异常时,会自动释放线程占有的锁,因此不会导致死锁现象发生;而 Lock 在发生异常时,如果没有主动通过 unLock()去释放锁,则很可能造成死锁现象,因此使用 Lock 时需要在 finally 块中释放锁。
- Lock 可以让等待锁的线程响应中断,而 synchronized 却不行,使用 synchronized 时,等待的线程会一直等待下去,不能够响应中断。
- 通过 Lock 可以知道有没有成功获取锁,而 synchronized 却无法办到。
- Lock 可以提高多个线程进行读操作的效率,既就是实现读写锁等。